The Supply edit Setup guide / The home setup
Cold brew coffee supplies
A little planning, a slower brew. Choose a vessel, get the filtration right, and make a batch that fits your week.
Practical advice based on manufacturer instructions. Equipment photographs illustrate the setup; this is not a hands-on product test. About this guide
Start with the essentials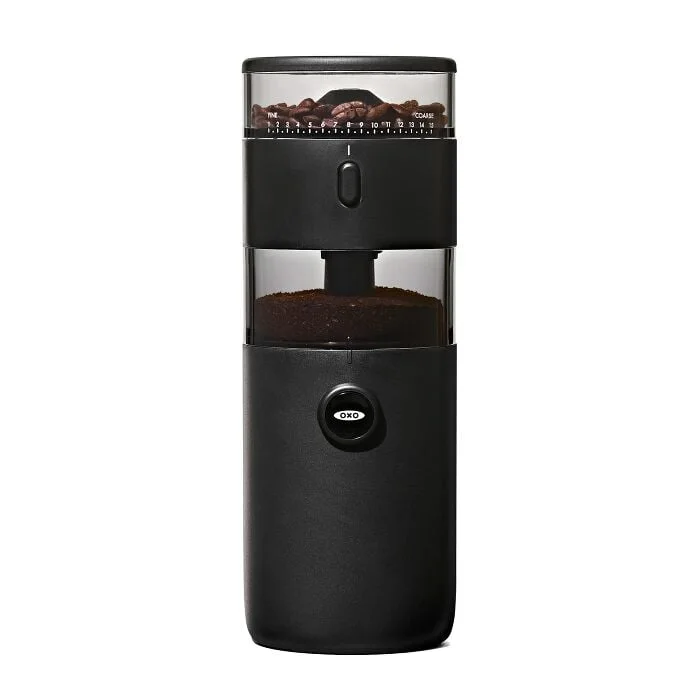
OXO Compact · a dedicated brewing optionProduct photograph · OXO
For home cold brew, start with coarsely ground coffee, drinking water, a covered food-safe vessel, a way to filter the grounds, and a clean container for refrigerated storage. You do not need a powered brewer. Decide whether you want concentrate or coffee ready to drink before choosing your recipe and container size.
The essential cold-brew checklist
Buy for the whole process, including draining and cleanup. A brewer that fits on the counter may still be too tall for your refrigerator or difficult to empty into your storage bottle.
- Coarsely ground coffee, or whole beans and a grinder with a suitable coarse setting.
- A covered food-safe brewing container with room for both water and grounds.
- A reusable basket, brewing bag, or strainer and compatible paper filter to separate the coffee from the grounds.
- A clean, closable storage container that fits in the refrigerator, plus a funnel if its opening is narrow.
- A kitchen scale or the brewer's specified measuring tools, a timer, and a label for the batch date and recipe.
Choose a jar or a dedicated brewer
A wide-mouth jar works for trying the method if you already have a suitable filter and a second vessel to catch the coffee. A dedicated brewer becomes useful when you want easier draining, a fitted filter, or a repeatable fill level. Compare the usable batch size, replacement-filter availability, and how easily you can reach the corners for cleaning. Check whether the advertised capacity means water added, brewed concentrate, or drinks after dilution; those are different quantities.
Separate brewing ratio from serving dilution
A brewing ratio describes dry coffee and water before steeping. Serving dilution describes the finished concentrate and what you add to it. For example, 100 g of dry coffee with 500 g of water is a 1:5 brewing ratio; that arithmetic alone does not specify a complete recipe. Adding 100 g of water to 100 g of finished concentrate is a separate 1:1 dilution. Measure the drained concentrate when planning servings, because the grounds retain some of the brewing water.
Use a recipe matched to your brewer
For its Compact Cold Brew Coffee Maker, OXO specifies 175 g of coarsely ground coffee and 24 fl oz of water. Its refrigerator method takes 20–24 hours, and its serving suggestion is 2 fl oz of concentrate with 4–6 fl oz of water or milk. Those instructions belong to that brewer; use the appropriate manual for another system. Note that fluid ounces measure volume, while ounces on a coffee scale measure weight. Do not treat them as interchangeable.
Choose filtration for the cup and the cleanup
A removable mesh basket keeps the grounds together and avoids buying a paper for every batch. If the result has more sediment than you enjoy, try a compatible paper filter as a finishing step. With loose grounds, strain out the larger particles before passing the liquid through paper, and allow time for it to drain. Before choosing a reusable filter, check its cleaning instructions and replacement availability: an inexpensive brewer is less useful if its only filter is difficult to maintain.
Store the concentrate, mix drinks as needed
Use clean equipment, keep finished concentrate covered in the refrigerator, and label it with the brewing date. OXO gives up to 14 days of refrigerated storage for concentrate made with its Compact system. Follow your own brewer's storage instructions; that is not a blanket shelf life for every homemade batch or a drink already mixed with milk. Start with a smaller batch while learning how much you use, and add milk to individual servings rather than the full storage bottle.
Common questions
Do I need beans labeled for cold brew?
No. Start with a coffee whose tasting notes sound appealing, and use the grind and recipe specified for your brewer. Try a small batch before committing a whole bag; the dilution and whether you add milk will also shape the drink you prefer.
How much concentrate should I make?
Work backward from your serving. If each drink uses 60 ml of concentrate and you want five drinks, you need 300 ml of drained concentrate. Use your brewer's expected output to choose a batch; water added is not the same as concentrate collected.
Why is my cold brew too strong?
Check whether the recipe makes concentrate. Dilute a small serving gradually with water or milk, keeping track of how much you add. If dilution fixes it, you can keep the brewing recipe and repeat your preferred serving mix next time.
About this guide
This is a home setup checklist, based on the manufacturer instructions linked beside the relevant advice. It is not a ranking of tested products. Use the instructions for your exact brewer or machine when choosing compatible parts, recipes, water treatment, and cleaning products.
Product photographs show examples of the equipment discussed. The pictured model is not a required purchase. Links are direct, non-affiliate links.
Find your next coffee
Compare tasting notes, origins, and processing details, then choose a bag size and grind for your setup.
Browse specialty coffees · Search by flavor, roast, and budget
Explore another brewing setup
View all guides
Setup guide
Pour over coffee supplies
One brewer, the right papers, and a repeatable routine. Build a pour-over setup around the cup you actually make.
Read the guide
Setup guide
Espresso bar supplies
Give every tool a job. A practical home espresso station starts with compatible equipment, a scale, and a little care.
Read the guide